Homeowners report total installed costs ranging from about $700 to $4,500 for a Tesla Wall Connector. You’ll pay $475–$595 for the hardware, then add labor, permits, and materials. Panel capacity, run length/conduit, and trenching drive price. Code compliance (NEC 625/220), permits, and a licensed electrician are essential for safety and insurance. Incentives can trim hundreds. You can estimate your project now—but a few hidden factors often swing the final number.
Key Takeaways
- Hardware costs $475–$595; buy from Tesla or authorized distributors to preserve warranty and eligibility for rebates.
- Typical professional installation of a 60A circuit runs $1,200–$2,500, varying by distance, wall type, and panel condition.
- Common adders: panel upgrade $1,200–$3,000, trenching $10–$20/ft, outdoor disconnects and weatherproof fittings.
- Expect permits and inspections; timeline is usually 1–3 weeks, with rough‑in and final inspections.
- Typical urban total: roughly $1,700–$3,100+ before incentives; utility rebates and tax credits can reduce out‑of‑pocket cost.
What You’ll Pay for the Charger Itself

Most buyers will spend about $475–$595 for the Wall Connector hardware itself. You’ll choose between current-generation models with either a 24-foot cable or a shorter option; Model Pricing varies slightly by finish and inventory. Confirm that the unit is UL listed, supports your vehicle’s charging rate, and ships with required mounting hardware and documentation. Shipping Costs depend on destination, carrier, and speed; budget for sales tax. Order directly from Tesla or an authorized distributor to maintain warranty chain-of-custody and avoid counterfeit or gray-market stock. Verify return policies and restocking fees before purchase. Inspect packaging on delivery for damage, and don’t energize a unit with compromised housings, seals, or connectors. Keep receipts for rebate eligibility. Confirm plug standard, firmware support, and regional certification markings before.
Typical Installation Labor and Materials

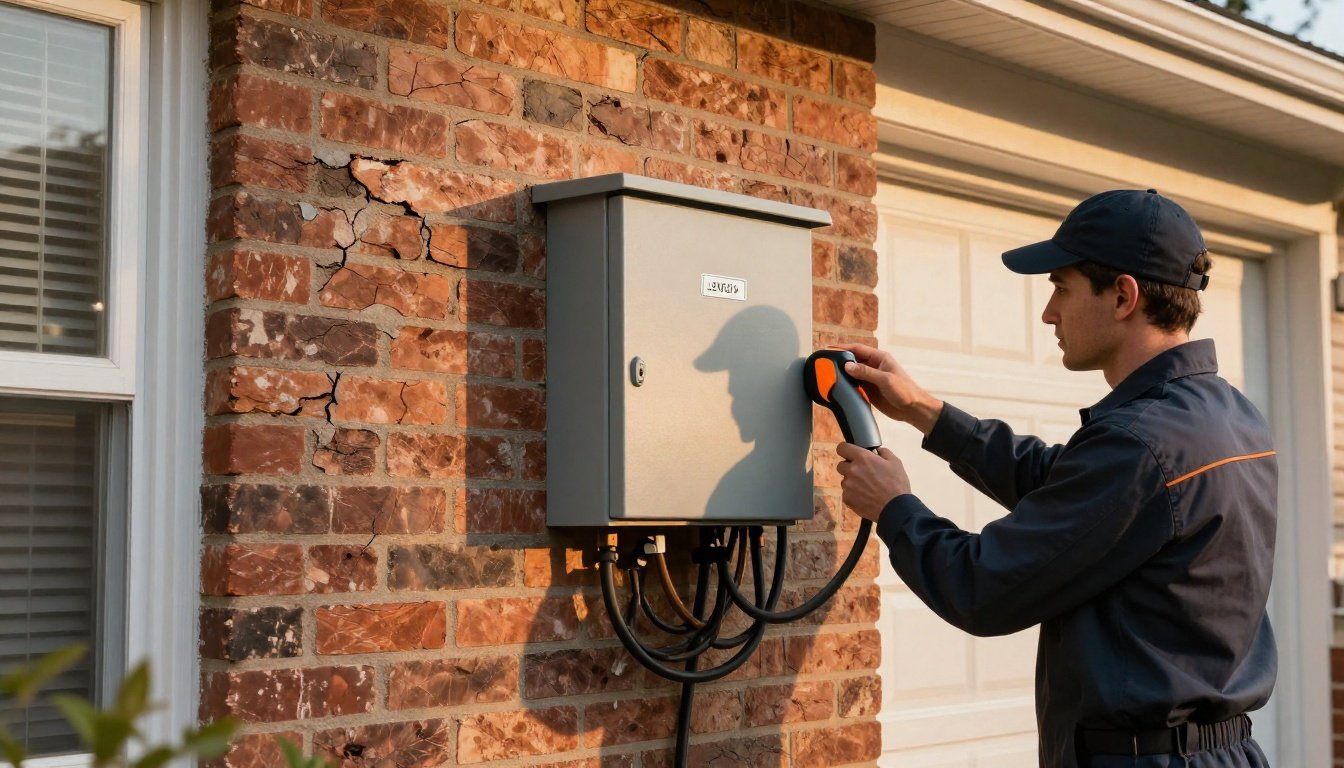
After you purchase the Wall Connector, installation labor and materials set the real budget. A licensed electrician typically performs a site walk, pulls a permit, and installs a dedicated 60A circuit per NEC Article 625 and 210. They mount the unit, run conduit or cable from your service equipment, install a breaker matched to conductor ampacity, and label directories. Typical materials include copper THHN/THWN conductors, EMT or PVC conduit and fittings, a 2‑pole breaker, disconnect (where required), fasteners, sealants, and hardware. Labor covers panel work, routing, terminations, torque verification, insulation resistance checks, GFCI functionality, and cleanup, including scrap disposal. You should expect crew efficiency from a two‑person team with calibrated tools, proper PPE, and lockout/tagout, plus inspection support and as‑built documentation for your records.
Factors That Drive Costs Up or Down

You’ll see costs shift based on electrical panel capacity—if the load calculation under NEC 220 shows insufficient spare amperage, you’ll need a service/panel upgrade or load management, plus a dedicated 2‑pole breaker sized per NEC 625 and 210. The distance to the breaker drives conduit length, conductor gauge for voltage drop, and labor; longer or exterior/trenched runs raise material costs and permit/inspection scope. Insist on permitted, code‑compliant work—correct overcurrent protection, grounding/bonding, and working clearances reduce hazards and prevent rework.
Electrical Panel Capacity
Because your electrical panel ultimately determines whether a Wall Connector’s dedicated circuit can be added safely, its capacity is a primary cost driver. A licensed electrician should perform an NEC Article 220 load calculation, check bus rating, main breaker size, and available spaces, and verify any tandem breaker restrictions. For a 48A Wall Connector setting, you’ll need a 60A two‑pole breaker and conductors sized per 125% continuous load. If the calculation fails, you may need a service upgrade, a subpanel, or load management.
Pros use thermal imaging under load to spot overheating lugs or breakers, prompting torque corrections or replacements. Confirm proper panel ventilation and clearances per NEC 110.26. Address corrosion, aluminum terminations, and arc‑fault concerns. These findings influence scope and cost, and labor.
Distance to Breaker
How far the Wall Connector sits from the service panel directly drives material and labor cost. Longer runs mean more copper or aluminum, more conduit, and more time fishing or trenching. To meet code, you’ll size conductors and limit branch-circuit voltage drop to about 3%, which may require upsizing. Architectural Constraints—finished walls or masonry—raise routing complexity. Basement Access can reduce cost with straighter pulls and fewer penetrations.
- Conductor sizing: A 60A circuit might need #6 Cu for short runs; distance can justify #4 Cu to control voltage drop.
- Pathway type: EMT on walls, PVC underground, or SE cable where permissible—each has different material and labor impacts.
- Routing labor: More bends, pull boxes, penetrations, and trench depth add hours; maintain clearances and support per NEC.
Regional Price Ranges and Real-World Examples

You’ll see coastal markets price higher than inland due to labor rates, corrosion-resistant materials, and stricter NEC/local amendments. Urban installs often cost more than rural because of permit fees, union labor, limited panel access, and trenching constraints, while rural work can spike with long conduit runs and utility coordination. We’ll map case studies by state—e.g., California coastal vs. Central Valley, New York City vs. upstate, and Texas metro vs. rural—to show code-driven scope, permit timelines, and total installed price ranges.
Coastal vs. Inland Costs


While hardware pricing is consistent, installed costs swing widely between coastal metros and inland markets due to higher labor rates, stricter permitting, corrosion mitigation, and older service panels in dense housing. On the coasts, you’ll often pay for NEMA 4 enclosures and coated conduit to resist Saltwater Corrosion, plus GFCI and bonding per NEC 625 and 250. Insurers may require load calculations and arc-fault protection, which can raise Insurance Premiums. Inland installs trend cheaper with shorter permit queues, but panel upgrades or trenching can still add cost.
- Pacific Coast condo retrofit with meter-room run: $2,200–$4,500; includes 60A circuit, corrosion-rated hardware.
- Gulf Coast detached garage: $1,600–$3,200; NEMA 4X, in-use covers, GFCI.
- Inland Sun Belt new build: $900–$1,800; prewire, 60A breaker, load calc.
Urban Versus Rural Pricing
Most urban installs price higher than rural due to elevated labor rates, permit/inspection fees, access constraints, and multifamily routing that drives longer conduit runs and firestopping. In dense cores, you can expect $1,200–$2,500 for a 60A circuit, driven by union labor, parking-structure coring, and after-hours access. Suburban or rural single-family homes often land $700–$1,500 with panels close and walls open. However, long rural trenching to a garage can often add $10–$20/ft and quickly narrow the gap.
Population Density and Adoption Patterns shape demand: calendars fill, lead times rise, pricing follows. For compliance, you must secure permits, NEC 220 load calculations, grounding/bonding, and GFCI where required by 625/210.8. Typical adders include panel upgrades ($1,200–$3,000), AFCI breakers in dwelling units, and weatherproof fittings for outdoor locations.
Case Studies by State
How do state-by-state conditions translate into real installation costs? You’ll see meaningful differences driven by labor rates, permitting rigor, utility rules, and climate. Always require NEC 625 compliance, load calculations, and properly sized breakers and conductors.
- California: $900–$2,500. High labor, strict permits, and wildfire codes. Expect EVSE load calc, 60A circuits, AFCI/GFCI where required, and Title 24 checks. Cultural attitudes favor EVs, so seasonal adoption spikes can extend lead times.
- Texas: $600–$1,800. Costs hinge on panel distance and trenching. Cities may require permits and inspections; co-ops vary. Use copper conductors sized for ambient heat and NEMA enclosures.
- New York: $800–$2,200. Older housing drives panel upgrades and AFCI. Cold-climate derating, outdoor GFCI protection, and conduit sealing matter. Incentives help offset higher labor.
Permits, Inspections, and Code Requirements

Before you run wire for a Tesla Wall Connector, obtain the electrical permit from your local authority having jurisdiction (AHJ) and schedule required inspections. Expect plan review and two inspections: rough-in (conductors, conduit, box, grounding) and final (terminations, labeling, commissioning). Build realistic Timeline Expectations of 1–3 weeks, longer if a service upgrade is needed.
Submit a Documentation Checklist: load calculation (NEC 220), one-line diagram, site plan, equipment specs, breaker size, conductor type/size, and grounding method. Comply with NEC 625 for EVSE, 110.26 for working clearances, and 300 for wiring methods. Size the overcurrent device at 125% of continuous load. Use copper THHN/THWN-2 in listed raceway; bond equipment grounds. Avoid redundant GFCI with the Wall Connector’s integral protection. Provide labeling and torque verification records kept.
DIY vs. Licensed Electrician: Risks and Savings

While DIY work can trim labor costs, installing a Tesla Wall Connector is a code-governed project where mistakes carry safety, legal, and insurance consequences. You’ll weigh fees against arc-faults, load calculations, and warranty implications. Licensed electricians validate conductor sizing, OCPD selection, grounding, and load management under NEC and local amendments. Their documentation protects resale value and Community Reputation, narrowing the Confidence Gap substantially between what you think is compliant and what passes inspection.
- Risks: Shock, fire, inspection failures, claim denials; mis-sized breakers, loose terminations, or improper torque can overheat.
- Savings: DIY saves labor, but callbacks, rework, and fines erase gains. Pros handle permits and inspections.
- Decision rule: If service upgrades, long runs, or derating apply, hire a licensed electrician; otherwise budget for professional verification.
Add-Ons and Upgrades Worth Considering

Even with a straightforward run, the right add-ons can boost safety, reliability, and inspection outcomes—and they’re cheapest to include during the initial install. Consider a Type 2 whole‑home surge protective device at the service, plus a lockable, line‑of‑sight disconnect for outdoor mounts. Specify copper THHN/THWN‑2 conductors, upsized one gauge for voltage drop on long runs, and NEMA 3R/4X fittings with anti‑corrosion hardware. Use a 2‑pole breaker with matching series, torque to spec, and apply permanent circuit labeling per NEC 110.22. For Smart Integration, add a load‑management relay or panel monitor to prevent main overloads and coordinate multiple EVSEs. Improve usability with cable management, pedestal or flush routing, and conduit color or covers as Aesthetic Options. Verify Wi‑Fi signal strength before final placement and commissioning.
Rebates, Tax Credits, and Utility Incentives

After specifying hardware and wiring methods, reduce your net cost by stacking incentives for the EVSE and any service upgrades.
Use stacking strategies that prioritize instant rebates first, then tax credits on remaining out-of-pocket.
Perform eligibility verification early, and document permits, inspections, and proofs.
- Federal credit (IRC 30C): claim up to 30% of qualified residential EVSE costs (max $1,000) on Form 8911 if your home is in an eligible census tract. Equipment must be UL listed, grounded, and placed in service after inspection.
- State/local and utility rebates: many require pre-approval, a licensed electrician, closed permits, photos of labeling, and NEC-compliant installation. Some add TOU-rate or demand-response enrollment.
- Upgrade incentives: programs sometimes offset panel/service upgrades when required for safe, code-compliant load capacity.
How to Get Accurate Quotes and Prevent Surprise Charges

Because every service and site condition differs, you’ll only get accurate quotes when you give contractors a complete, code-specific scope and objective site data. Provide panel rating, service size, spare capacity, feeder length, conduit path, wall material, mounting location, Wi‑Fi strength, and photos. Specify NEC Article 625 compliance, GFCI requirements, conductor type, breaker rating, and load calculation method. Use a Quote checklist: permits, utility coordination, trenching, drywall repair, AFCI/GFCI breakers, bonding, labeling, commissioning, and inspection fees. Ask for line-item pricing, change-order rules, and exclusions in writing. Verify license, insurance, and warranty. Compare apples-to-apples designs. Apply Negotiation tactics: flexible schedule, bundled work, and alternate materials that still meet listing and local amendments. Don’t pay in full until passed inspection, and obtain final signed permit card.
Conclusion
You now know the hardware price and the realistic installed range, plus what pushes costs up. Get multiple licensed‑electrician quotes, require a written scope, and confirm permit, load calculation (NEC 220), breakers, conductor sizes, and GFCI/grounding. Ask about trenching, panel upgrades, and inspection fees. Verify utility rebates and tax credits to cut net cost. Don’t DIY line-voltage EVSE; prioritize code compliance and labeling. Plan carefully and your install will run like a well‑routed conduit today.