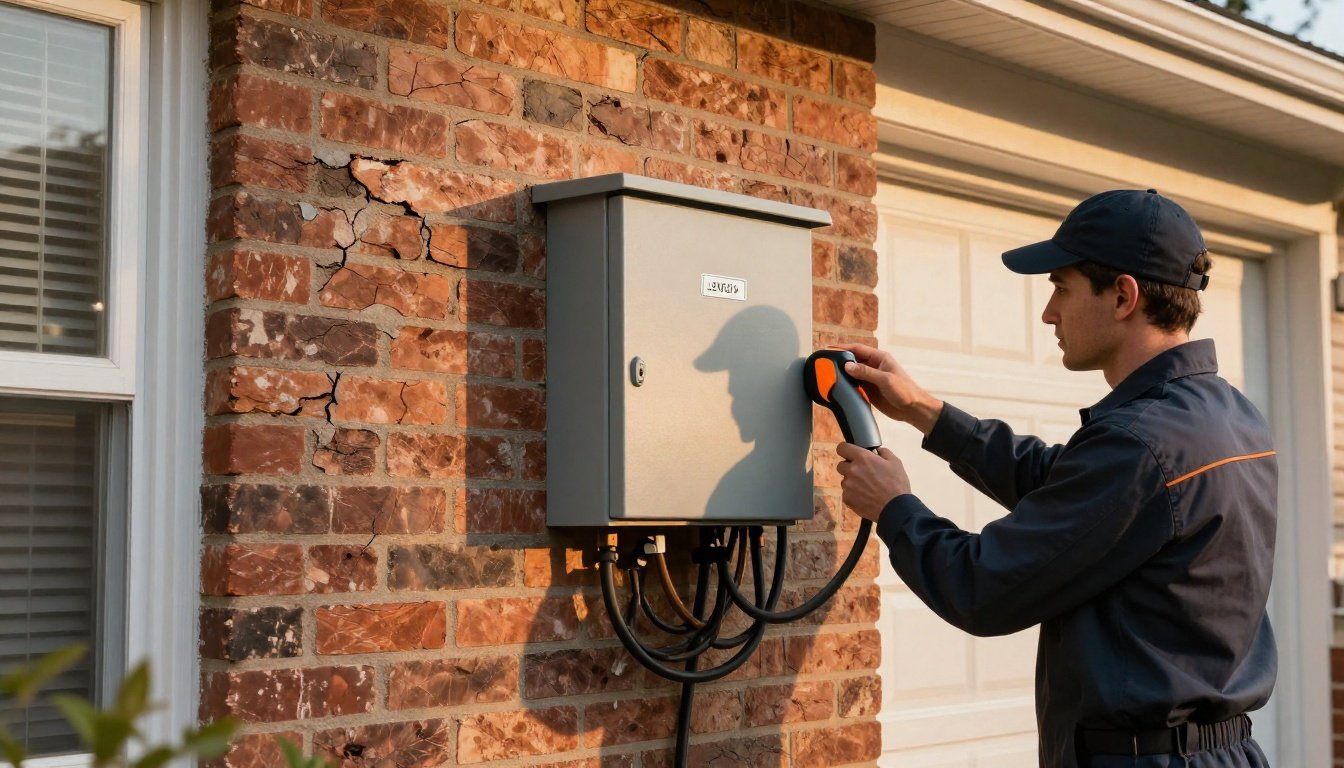
In a 1960s attached garage, you can add a Level 2 EV charger, but start with a load calculation to confirm panel capacity for a continuous EV load. Pull a permit, plan GFCI/AFCI where required, and meet NEC 625 clearances, mounting height, cord management, and moisture protection, plus garage fire-separation and ventilation. Hardwired EVSE or NEMA 14‑50? Size breaker and conductors correctly—then avoid inspection surprises by confirming these items first.
Key Takeaways
- Yes—garages are common sites for EVSE; choose a UL‑listed Level 1 or Level 2 unit with appropriate enclosure rating for indoor garages.
- Verify electrical capacity via NEC load calculation; treat EVSE as continuous load and size breaker/conductors accordingly; upgrade panel if necessary.
- Obtain permits and inspections; provide Class A GFCI protection and avoid stacking GFCI with EVSE integral protection to reduce nuisance trips.
- Decide between a NEMA 14‑50 plug‑in or hardwired EVSE; hardwired is more robust, plug‑in offers flexibility for renters or future moves.
- Mount near the vehicle inlet, keep cords managed and off floors, provide ventilation/moisture control, and maintain required clearances in the garage.
Level 1 vs. Level 2: Which Charging Speed Fits Your Routine

How quickly do you need to replenish range? Map your commute patterns and typical charging windows, then match them to charging levels. Level 1 (120 V, ~12 A continuous) delivers roughly 1–4 miles per hour; it suits overnight recovery and low daily mileage. Level 2 (240 V, 16–48 A EVSE) provides about 12–45 miles per hour, supporting short charging windows and higher utilization. For safety and code compliance, use a listed EVSE, install it on a dedicated branch circuit, protect receptacles in garages with GFCI, and mount hardware per manufacturer instructions. Prefer hardwired Level 2 for durability. Keep cords off the floor, avoid extension cords, maintain clear working space, and verify the location minimizes cable trip hazards and vehicle strain in normal garage conditions.
Assessing Electrical Panel Capacity and Load Calculations

Before you pick an EVSE, confirm your service and panel can carry it by performing a code‑compliant load calculation. Start with NEC 220: determine service rating (e.g., 100A/150A/200A), list fixed appliances, apply demand factors, and treat EV charging as a continuous load at 125% of its nameplate. Verify available ampacity on the bus and main breaker after diversity. Check conductor sizes and temperature ratings; match terminations. Verify breaker coordination and that the EVSE overcurrent device matches conductor ampacity and interrupting rating. Confirm spaces, handle ties, and working clearances. Update panel labeling to identify the EV circuit, breaker size, and location. If the calculation shows insufficient capacity, plan a service or panel upgrade rather than overfusing or double‑lugging. Document torque values and enclosure listing compliance.
Outlet (NEMA 14-50) vs. Hardwired: Pros, Cons, and Use Cases

While either a NEMA 14-50 receptacle or a hardwired EVSE can be code-compliant, your choice should hinge on continuous load, protection requirements, and environment. For 40A charging, a 14-50 plus plug-in EVSE gives you flexibility and replacement, but depends on receptacle integrity and cord management. Hardwiring cuts heat at terminations, removes plug wear, supports higher currents, and seals better in damp or dusty garages. Outlet installs fit renters and future moves; hardwired looks built-in and can aid resale value. Always match breaker, conductor, and EVSE nameplate.
Pick 14-50 flexibility or hardwired durability; match breaker, conductors, and EVSE nameplate.
- 14-50: 50A circuit; use 75°C lugs; manage strain well and plug wear.
- Hardwired: fewer failure points; neater routing; better moisture resistance.
- Maintenance: torque terminations; check heat discoloration; replace worn parts.
- Documentation: photos, invoice aid insurance implications and future resale.
Permits, Code Compliance, and GFCI Requirements

You should secure required local permits and schedule inspections to verify NEC-compliant conductor sizing, overcurrent protection, and grounding. Plan GFCI protection per NEC 210.8 and 625: place it at the source or first outlet as required, and confirm the device or breaker matches the circuit rating. Confirm labeling, working clearances, and equipment listings to pass inspection and maintain personnel protection.
Local Permits and Inspections
Why do permits and inspections matter here? They verify your EVSE installation meets NEC, utility, and local ordinances, protect you from liability, and validate load calculations and grounding. Apply before work starts; most jurisdictions require a plan showing circuit size, wiring method, OCPD, disconnecting means, and EVSE listing. An inspector verifies conductor sizing, AFCI/GFCI where required, bond/ground continuity, and labeling. Ask about inspector qualifications and how the appeal process works if you disagree with a correction.
- Obtain an electrical permit with site sketch, panel schedule, feeder/breaker size, conduit type, and load calculation.
- Schedule rough-in and final inspections; keep junctions, terminations, and equipment accessible and energized only when authorized.
- Provide EVSE datasheet, UL listing, torque reports, and panel labeling to document compliance.
- Correct violations promptly.
GFCI Placement and Ratings


Because EV charging circuits pose heightened shock risk, provide Class A GFCI protection and locate it so the EVSE receptacle or hardwired unit is within the protected zone to meet NEC and local amendments. Use a 2‑pole GFCI breaker for 240‑V circuits or a GFCI receptacle for 120‑V Level 1, but don’t stack protection with an EVSE that has integral ground‑fault detection; it can cause nuisance trips. Class A Trip Sensitivity is 5 mA; verify the device listing matches the circuit voltage and ampacity. Size overcurrent at 125% of EVSE nameplate (e.g., 40‑A EVSE on 50‑A breaker). Maintain proper line/load orientation, weatherproof covers in damp garages, and conductor AFCI/GFCI compatibility. Test monthly; failed self‑tests or corrosion shorten Device Lifespan—replace promptly. Document settings for inspectors.
Placement, Cord Management, and Garage Layout Tips

Before mounting the EVSE, plan placement to meet NEC 625 and the manufacturer’s listing while keeping charging ergonomic and safe. Set Mounting Height so the connector rests between 18–48 inches above finished floor, and position the unit near the vehicle inlet with Parking Alignment marks. Keep the receptacle or disconnect within sight; you’ll reach it. Route conductors in listed raceway, protect from impact, and maintain clearances at the service equipment.
Plan EVSE placement to meet NEC 625, ensure ergonomic charging, proper height, visibility, and protected routing.
- Locate the EVSE on the driver’s preferred side to minimize cord stretch; verify reach to all intended vehicles.
- Provide a listed holster and hook; coil the cord without creating trip hazards.
- Keep cords off the floor crossings and away from door tracks or tires.
- Leave 30–36 inches aisle clearance around obstacles and label pathways.
Ventilation, Moisture, and Safety Considerations for Attached and Detached Garages

You’ll provide ventilation and airflow by providing cross-ventilation or mechanical exhaust per IMC/IFC, maintaining EVSE clearances, and avoiding charging in sealed spaces. You’ll control moisture with NEMA 3R/4 EVSE and fittings, GFCI protection, in‑use covers, drip loops, sealed penetrations, and corrosion‑resistant hardware. You’ll address attached vs detached safety by maintaining fire separation and sealed air barriers with a readily accessible disconnect for attached garages, and by verifying grounding/bonding, feeder AFCI/GFCI compliance, and setbacks from doors/windows for detached garages.
Ventilation and Airflow
How you manage ventilation and airflow in the garage directly affects charger reliability, corrosion risk, and occupant safety—especially in attached spaces. Provide continuous, low-noise mechanical ventilation sized by volume and required air changes per hour. Position supply low and exhaust high to counter thermal stratification and carry heat away from EVSE heat sinks. Maintain code clearances around the charger; don’t enclose it. Interlock ventilation with charger operation where feasible, and verify airflow with measured CFM, not guesses. Seal penetrations to prevent backdrafts and maintain designed pressure differentials.
- Calculate ACH and CFM: Volume × ACH ÷ 60.
- Locate exhaust near ceiling; supply at floor-level opposite wall.
- Use sealed, brushless fans; rate for continuous duty and temperature.
- Test with anemometer; commission annually; document settings for inspectors.
Moisture Control Measures
Because moisture accelerates corrosion and electrical failures, manage it as deliberately as you manage ventilation. Control bulk water first: establish perimeter grading that sheds stormwater, maintain gutters/downspouts, and provide sub slab drainage with a capillary break and a 10‑mil vapor retarder under the slab; seal control joints. Hold indoor RH near 50% with a dehumidifier and a humidistat-driven exhaust fan. Specify EVSE and outlets listed for damp or wet locations (NEMA 3R/4, IP54+), with integral GFCI per NEC 625. Use corrosion-resistant raceways and raintight fittings, add drip loops, and seal penetrations. Mount equipment above splash zones per manufacturer instructions. Slope floors to a drain, use in-use covers on receptacles, store cords on hooks, and inspect annually. Record humidity, and remediate leaks immediately after storms.
Attached Vs Detached Safety
While attached garages can shorten conduit runs, they demand tighter control of ventilation, moisture, and fire separation to protect the dwelling. In attached spaces, seal penetrations, install self-closing, 20‑minute doors, and maintain continuous gypsum fire barriers per code. Provide dedicated exhaust or verify natural ventilation achieves code air changes, and keep EVSE above potential flood lines. Detached garages relax dwelling exposure, but you should still manage condensation, rodent ingress, and weather-driven corrosion.
- Size branch circuits and OCPD for EVSE nameplate; add GFCI where required.
- Use NEMA 3R/4 enclosures, in-use covers, and drip loops to fight moisture.
- Provide Security access controls; lockable breakers and EVSE.
- Document permits and inspections; disclose EVSE to carrier for Insurance implications.
Verify bonding, clearances, and cord management to prevent hazards.
Smart Features, Future-Proofing, and Typical Costs

Before selecting an EVSE, prioritize code-compliant smart features and a design that anticipates higher loads and evolving standards. Choose a UL-listed unit with GFCI, NEMA 3R/4 enclosure, and secure app integration; confirm optional subscription fees for analytics, demand response, or remote billing. Look for Wi‑Fi/Ethernet, OCPP support, OTA firmware, load sharing, and utility price signals.
Future‑proof the branch circuit: install 1‑inch conduit, 6 AWG Cu, and a 60 A breaker to support 48 A EVSEs under the 80% rule. Consider hardwired over receptacle to meet NEC 625 and reduce nuisance GFCI trips; add a Type 2 SPD at the service.
Typical costs: EVSE $400–$1,200; permits $50–$300; installation $500–$2,500; service/panel upgrades $1,500–$3,500. Seek rebates. Document load calculations, permits, inspections, and records to verify compliant commissioning.
Conclusion
You can put a charger in your garage—and, by coincidence, every safe choice aligns with code. You verify load calcs, then discover your panel’s capacity matches a Level 2 circuit. You pull a permit, hire a licensed electrician, and choose hardwired over NEMA 14‑50 for continuous load reliability. You add GFCI where required, respect mounting heights, manage cords, seal moisture paths, and preserve fire separation. Convenience follows compliance—and your EV charges as designed, without surprises.