You don’t need to guess the cost—typical Rolec WallPod installs run £700–£1,200 inc VAT, covering the unit, up to 10 m surface cable, Type A RCBO/RCD with DC detection, testing, commissioning, and certification. Final price hinges on BS 7671 compliance, PME/TT earthing, cable route and length, CU upgrades, trenching, and DNO approvals. OZEV eligibility also affects scope and evidence. Learn what to prepare now to control spend, meet safety standards, and avoid avoidable variations.
Key Takeaways
- Typical install costs £700–£1,200 incl. VAT, including certified WallPod, Type A RCBO/RCD, testing, commissioning, certificate, and up to 10 m surface cable.
- Price varies with cable route length, drilling, consumer unit capacity; common add‑ons include earth electrode, load curtailment, CT clamp, SPD, trenching, armoured cable.
- Grants require OZEV‑approved installer and smart WallPod, off‑street parking or consent, vehicle proof, and submission of photos, commissioning report, EIC, and DNO notification.
- Install to BS 7671: dedicated circuit, Type A RCBO/RCD, PME/PEN protection (O‑PEN), load assessment, volt‑drop, Zs and PFC checks, dynamic load control if needed.
- Provide suitable mounting location and route, confirm earthing and bonding, spare consumer unit ways, Wi‑Fi/Ethernet, then torque, test RCDs, label circuits, and issue certificates.
Typical Installation Costs and Price Factors

Most domestic Rolec WallPod installs in the UK typically land between £700–£1,200 (incl. VAT) depending on site conditions, supply characteristics, and compliance scope. You’ll price against BS 7671 design, RCD/RCBO selection (Type A), and earthing arrangements (PME with O-PEN protection), plus notification to the DNO where required. Cable route length, fabric penetration, meter-to-point distance, and consumer unit capacity drive labor variability and materials. Load assessment to avoid exceeding main fuse ratings, bonding verification, and prospective fault current measurements also affect time on site. If the existing board needs ways or upgrades, expect higher labour and test durations. Regional labour rates and access constraints further modulate cost. To manage cash flow, many installers offer financing options, subject to credit checks and eligibility and affordability criteria.
What’s Included vs. Common Add-Ons

While a standard Rolec WallPod install covers the BS 7671 essentials, it’s important to distinguish the core scope from chargeable extras. You typically get the certified charger, Type A RCBO or RCD protection with DC detection as required, meter tails connection, limited surface cabling, drilling, testing, commissioning, and an electrical installation certificate. Extras arise when site conditions demand longer cable runs, groundworks, load management hardware, or networking. Confirm earthing method (PME, TT) and surge protection needs. Clarify warranty coverage and the boundaries of customer support.
Standard WallPod covers essentials; extras depend on cable runs, earthing, surge protection, and networking.
- Included: charger, protective device, testing, installation certificate.
- Included: up to 10m surface cable, basic drilling.
- Add-on: earth electrode for TT or PME faults.
- Add-on: load curtailment, CT clamp, or SPD upgrade.
- Add-on: trenching, armoured cable, data link final commissioning.
Grants, Incentives, and Smart-Charger Eligibility

How do you make a Rolec WallPod install eligible for UK funding without compromising safety or compliance? Use an OZEV-approved installer, select an OZEV-listed smart WallPod, and align with current policy timelines. You’ll need off-street parking (or block/estate permission), evidence of vehicle eligibility, and landlord consent where applicable to support equity access for renters and flat occupants. Confirm the charger meets Smart Charging Regulations: secure onboarding, user-set schedules, demand-response capability, randomised delay, accurate metering, firmware updates, and tamper resistance. Keep records: photographs, commissioning report, serials, EIC, Part P/Building Regulations notice, and DNO notification where required. Verify installation to BS 7671 and the IET Code of Practice, with PEN-fault protection integrated. Apply promptly; many grants are capped, first-come, and audited for compliance, with evidence retention.
Electrical Requirements and Load Assessment

Because EV charging is a continuous high load, verify the installation can support a Rolec WallPod without breaching supply or BS 7671 limits. Confirm service head rating, main fuse, meter tails, and earthing type. Calculate maximum demand; treat the EVSE as continuous. Select a dedicated circuit with suitable MCB/RCBO and RCD Type A/B. Check PFC, Zs, volt-drop, ADS. Assess harmonic distortion effects and possible RCD nuisance. Consider inrush currents and device coordination.
Before installing a Rolec WallPod, verify supply, earthing, demand, ADS, PFC, Zs, and volt-drop.
- Verify spare capacity vs DNO cut-out; seek upgrade approval if required.
- Size conductors for thermal limits and volt-drop at full load.
- Provide PME/PEN-fault protection per 722, or use suitable alternative.
- Implement dynamic load control to protect the service main fuse.
- Record test results: insulation, R1+R2, Zs, PFC, RCD times and functionality verification.
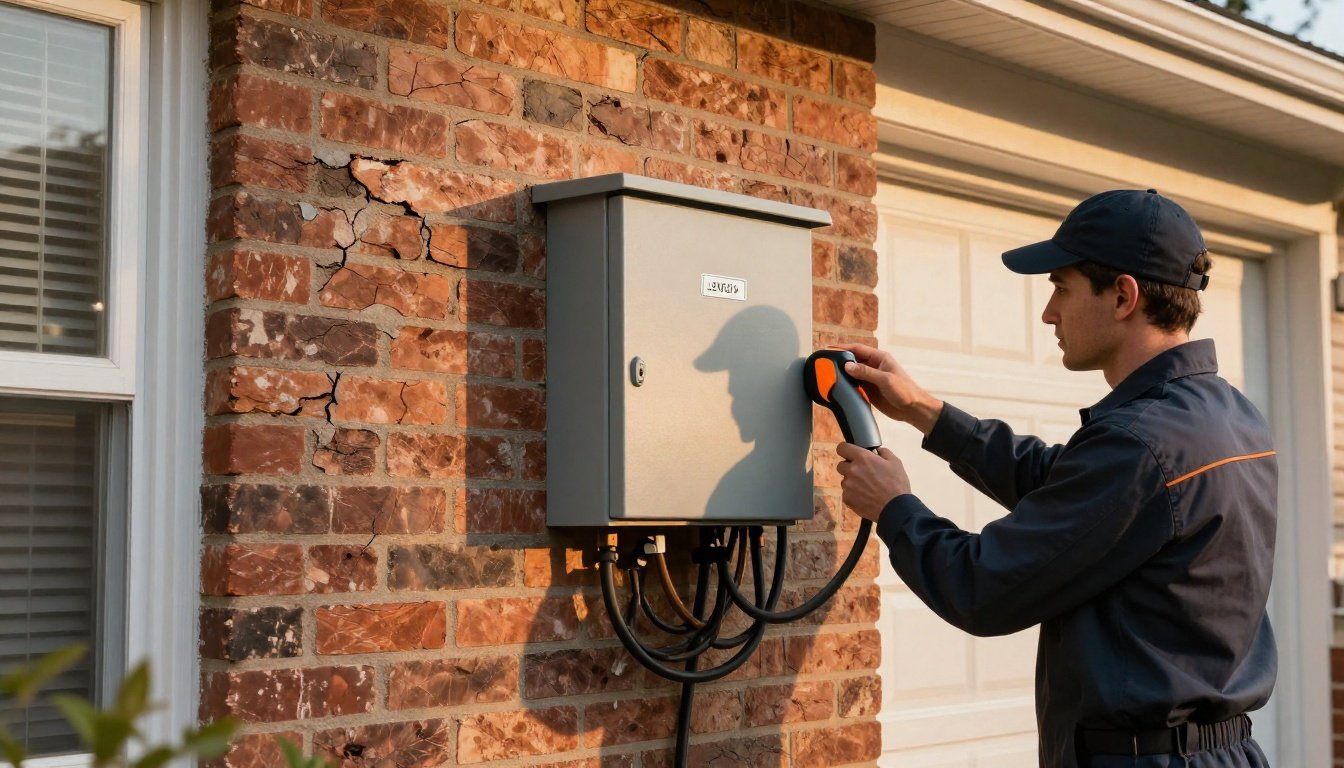
Location, Mounting, and Cable Routing

You select an ideal location that’s structurally sound, outside impact/flood zones, provides vehicle reach, and meets BS 7671 and IEC 61851 requirements. You mount the unit with the centerline 1.2–1.5 m above finished grade (or per local code) and maintain prescribed side/top/bottom clearances for ventilation, connector handling, and safe egress. You plan cable entry and routing to preserve the enclosure’s IP rating and strain relief: use UV‑rated glands/conduit, maintain bend radius and service segregation, and protect runs from mechanical damage and water paths.
Optimal Unit Placement
Before fixing the WallPod, verify the location and routing plan meets the manufacturer’s instructions and applicable codes (e.g., BS 7671/IET EV CP or NEC/CEC). Position it for User Accessibility, weather protection, and Aesthetic Integration. Choose a rigid, non-combustible mounting surface; don’t expose it to vibration, mechanical damage, or spray zones.
- Minimise distance to supply and bonding points to reduce volt-drop and fault-loop impedance.
- Route cables on the shortest safe path; segregate from data/telecoms; avoid thermal insulation.
- Use UV-resistant conduit or trunking outdoors; maintain bend radii and strain relief.
- Seal penetrations with fire-rated materials; fit IP-rated glands and drip loops.
- Prevent trip hazards and vehicle snag risks; provide robust cable management.
Complete a pre-energisation inspection, torque-test terminations, verify RCD/RCBO operation, and label circuits per code.
Mounting Height and Clearance


While manufacturer instructions govern final dimensions, set the WallPod so the socket/connector and holster fall within the local code-compliant reach range and working-space envelope, with unobstructed access for charging, inspection, and reset/testing. Target a mounting centerline that places the connector 900–1200 mm above finished floor, or per applicable accessibility code, to optimize user ergonomics. Maintain minimum side clearance for handle insertion and cable holstering, and provide 1 m clear working width where required. Mount on a flat, plumb surface; provide visual contrast between unit and background for quick identification under varied lighting.
| Parameter | Specification |
|---|---|
| Mounting height | Connector 900–1200 mm AFF (or per code) |
| Working clearance | Width 1 m; depth 1.2 m min where mandated |
Verify mounting hardware rating and corrosion protection match environment conditions.
Cable Entry and Routing
With the mounting height and working space set, plan cable entry and routing to protect conductors and maintain enclosure integrity. Enter from below or rear using approved knockouts and IP-rated glands. Maintain bend radius, segregate LV/CP/data, and avoid heat sources. Provide drip loops and mechanical support to BS 7671.
- Select entry points that avoid hidden services; verify with detection before drilling.
- Fit compression glands, earth bushings, and grommets to preserve IP rating and CPC continuity.
- Route in trunking or conduit; support cables per installation method C and derating factors.
- Seal penetrations with UV-stable, neutral-cure compound; provide rodent protection.
- Label circuits, torque terminations to spec, and test insulation and CPC polarity.
Complete sealant selection to suit substrate, confirm no water paths, and document as-built routes.
Permits, Notifications, and Certifications

Although requirements vary by jurisdiction, you must secure the required electrical permit(s), notify the utility/DNO where mandated, and use a certified installer before energizing a Rolec WallPod. Verify your installer’s credentials against national wiring regulations and EV charging standards. Typical prerequisites include load assessment, RCD/RCBO selection, bonding verification, and meter tail suitability, documented in a signed test schedule. Submit Compliance Documentation, including single-line diagrams, protective device ratings, and earthing method, to the permitting authority. Where notification schemes apply, file the completion notice within required timeframes and retain serial numbers and firmware versions. Obtain certificates: installation certificate, electrical test results, and, if applicable, DNO approval or service alteration confirmation. Confirm your contractor carries Liability Insurance and provides a warranty that aligns with statutory consumer protections.
Preparing Your Property to Minimize Extra Charges

Before installation, survey your site against BS 7671 Section 722 to eliminate common variation costs: confirm your service fuse rating and spare capacity, identify a cable route under the installer’s base-length threshold, and provide safe access for drilling without scaffolding. Verify earthing arrangement (PME/TN-S), main bonding continuity, and that your consumer unit has an RCD Type A or EV and spare ways. Mark buried services, plan garden protection, and clear a dry, illuminated work area. Photograph meter, cut-out, and proposed charger location for pre-approval; request written scope to avoid extras. Budget for insurance adjustments if supply upgrades are required.
- Provide accessible, lockable isolator switch.
- Confirm Wi‑Fi or Ethernet coverage.
- Pre-measure heights, clearances per applicable standards.
- Reserve parking; remove obstructions.
- Protect finishes; cover floors, vegetation.
Installation Timeline and What to Expect on the Day

Once pre-approval and access are confirmed, the installer arrives in the agreed window, conducts a site induction and risk assessment, then performs safe isolation (lock-off/tag, prove-dead with GS38-compliant test gear) before any work. They verify supply characteristics, main bonding, and earthing, then run a dedicated circuit with Type A RCBO and DC fault protection, fit SPD if required, mount the WallPod, and route/fix cabling to standards. They torque terminations, then test per BS 7671 and BS EN 61851: continuity, insulation, polarity, R1+R2, Zs, RCD times, and functional EV test. Next, they configure load management, CT clamp, and communications. Timeline Overview: expect 3–5 hours; longer if civil works or consumer unit upgrades. Customer Questions are welcomed during handover, documentation (EIC/Part P/DNO notice), and user training.
Choosing the Right WallPod Model and Installer

You’ll first choose between a tethered or socketed WallPod based on cable management, connector type, IP rating, and tamper/security needs. Compare charging speeds (3.6 kW, 7.2 kW, 11/22 kW) against your supply capacity, protective devices, and manufacturer limits to meet BS 7671 and IEC 61851. Verify the installer’s accreditation (OZEV-approved, NICEIC/NAPIT), calibrated test equipment, and competence to commission with RCD Type A/EV verification and certification.
Tethered Vs Socketed
Why choose a tethered or a socketed Rolec WallPod? You’ll balance User Preferences, site constraints, and compliance. Tethered units keep the Type 2 lead on the enclosure, reducing handling and trip hazards when managed correctly. Socketed units accept any compliant lead, enabling shared use across vehicles and easier cable replacement. Specify Locking Mechanisms for cable retention and access control. Assess IP rating, UV resistance, and mechanical protection to BS 7671 and IEC 61851. Position hardware to maintain clearances, strain relief, and stowage.
- Cable management: holster, reel, or hook to prevent abrasion, wear.
- Access control: keys, RFID, or app-authenticated, authorised release.
- Environmental sealing: gaskets, drain paths, correct gland torque, rating.
- Anti-theft features: tether locks, tamper-evident fixings, deterrence.
- Maintenance: inspect connectors, test RCD/RCBO, verify torque, periodically.
Charging Speeds Compared
How quickly a Rolec WallPod charges depends on the vehicle’s onboard charger, the available supply (single- or three‑phase), and a compliant circuit design to BS 7671 and IEC 61851. Match the WallPod rating to your EV’s AC limit: many models accept 7.4 kW single‑phase; others take 11 or 22 kW three‑phase. Use correctly sized cable, RCD Type A with 6 mA DC monitoring, and load management to protect diversity, battery longevity, and your service head. Moderate driver behavior—fewer rapid top‑ups—reduces thermal stress.
| Supply | WallPod rating | Approx charge gain |
|---|---|---|
| Single‑phase 16 A | 3.6 kW | 10–15 mi/h |
| Single‑phase 32 A | 7.4 kW | 22–30 mi/h |
| Three‑phase 16 A | 11 kW | 35–40 mi/h |
| Three‑phase 32 A | 22 kW | 65–80 mi/h |
Confirm earthing arrangements and PME restrictions before selection.
Installer Accreditation Checks
Although models look similar, verify the installer’s accreditations and the WallPod’s compliance before ordering. Confirm they’re OZEV-approved and registered with NICEIC or NAPIT. Ask for evidence of manufacturer training and product-specific commissioning procedures. Make sure the unit meets IEC 61851 and is installed to BS 7671, including RCD Type A protection and PME/PEN fault mitigation where applicable. Check the company’s background screening and insurance.
- Proof of OZEV status, competency cards, and calibration certificates.
- Documented risk assessment, load calculation, and circuit selection.
- Test results: Zs, R1+R2, insulation resistance, RCD trip times.
- Smart features validated: OCPP, firmware version, cyber-hardening, continuous auditing.
- Handover pack: EIC, Part P/Building Control notice, warranty, user training.
Only proceed when documentation is complete and traceable. Request references and a sample installation certificate too.
Conclusion
You’ve now got the facts to plan a safe, smart Rolec WallPod install. Specify compliant components—Type A RCBO/RCD with DC detection—and verify earthing (PME or TT), load, and cable routes. Select a smart model, submit OZEV evidence, and secure DNO notifications. Prioritize proper positioning, protective routing, and professional testing. Demand commissioning data, serials, and certification. Trim costs by sensible siting and short surface runs. Pick a proven, approved installer for steady, standards‑based, safety‑first charging performance.